Images are an integral part of any site, as they are usually the primary point of a page beyond text. Your images are what describe your words visually, and correct image formatting can make or break your site visits.
Before the days of BaseKit and other site building platforms, image settings were very limited and required a knowledge of HTML, at the very least. BaseKit circumvents the need for having to know any coding, allowing you to import, edit and size photos of all types and make your site shine even brighter.
Before you are able to add an image to Basekit, they must first be stored on your local computer. It is recommended you place all of your site content in one folder on your computer for easy access to your content.
Adding Images
To add photos and images to your website using BaseKit:
- Log in to your BaseKit account.
- On the left side navigation bar, select Media next to the Widgets option and select the Add button.
- A drop down menu will appear, allowing you to select Images.
- Select the images option from the menu, and upload the desired photo from your computer.
For photography type images, the JPEG format is best. For graphics and other images, the PNG format is preferred for optimal viewing and editing.
The Images Options Toolbar
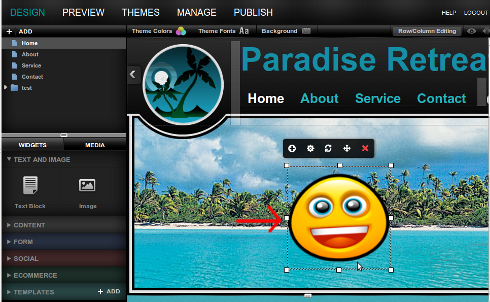
Once you have successfully uploaded an image in BaseKit, you will see the following option menu above your image.

- Change Image – This button will allow you to see the images you have in your library as well as change the selected image for another.
- Configure Image – This will allow you to add a link to your image, as well as other properties.
- Reset Image – This will reset the image to the default size.
- Move Image – This will allow you to drag your image to another location on the page.
- Delete Image – This will delete this image from the page.
Additionally you can resize your image using the scale boxes that appear in white around your image, shown below.


